How to Make a Dedicated Terraria Server on Windows 10
01 Dec 2019I wanted to set up a dedicated Terraria server to run in the background of my Windows 10 PC, but there were no good tutorials out there. I stumbled my way through several different bits and pieces I found on the Internet, til I achieved this. Here is how I did it.
What We Will Be Building
In this tutorial, I will go over how to set up a dedicated Terraria server to run in the background of your Windows 10 PC. This means that you can set up a server and play with your friends whenever you like, but also be able to use your computer for other things.
Step 1: Install Appropriate Software
You will need some additional software to get this to work properly on you’re computer. The software you need is listed below:
- TShock: This will be used to enable autosaving of your server every few minutes.
- NSSM: This will be used to set up a daemon for the server to run on.
And that should be it! Now a couple instructions to install the software properly.
Installing TShock
To install TShock, go to this link and click on tshock_4.3.26.zip. When prompted to save it, save it to your downloads folder or somewhere else that you will be able to easily find it. This is the version I installed, and you are welcome to follow along using it. If you want the latest version, go to this link and click the version at the top, then install the zip file for that version.
Once you have it installed, right click the file that was downloaded and press extract all, when prompted for a location, just leave the default and press OK.
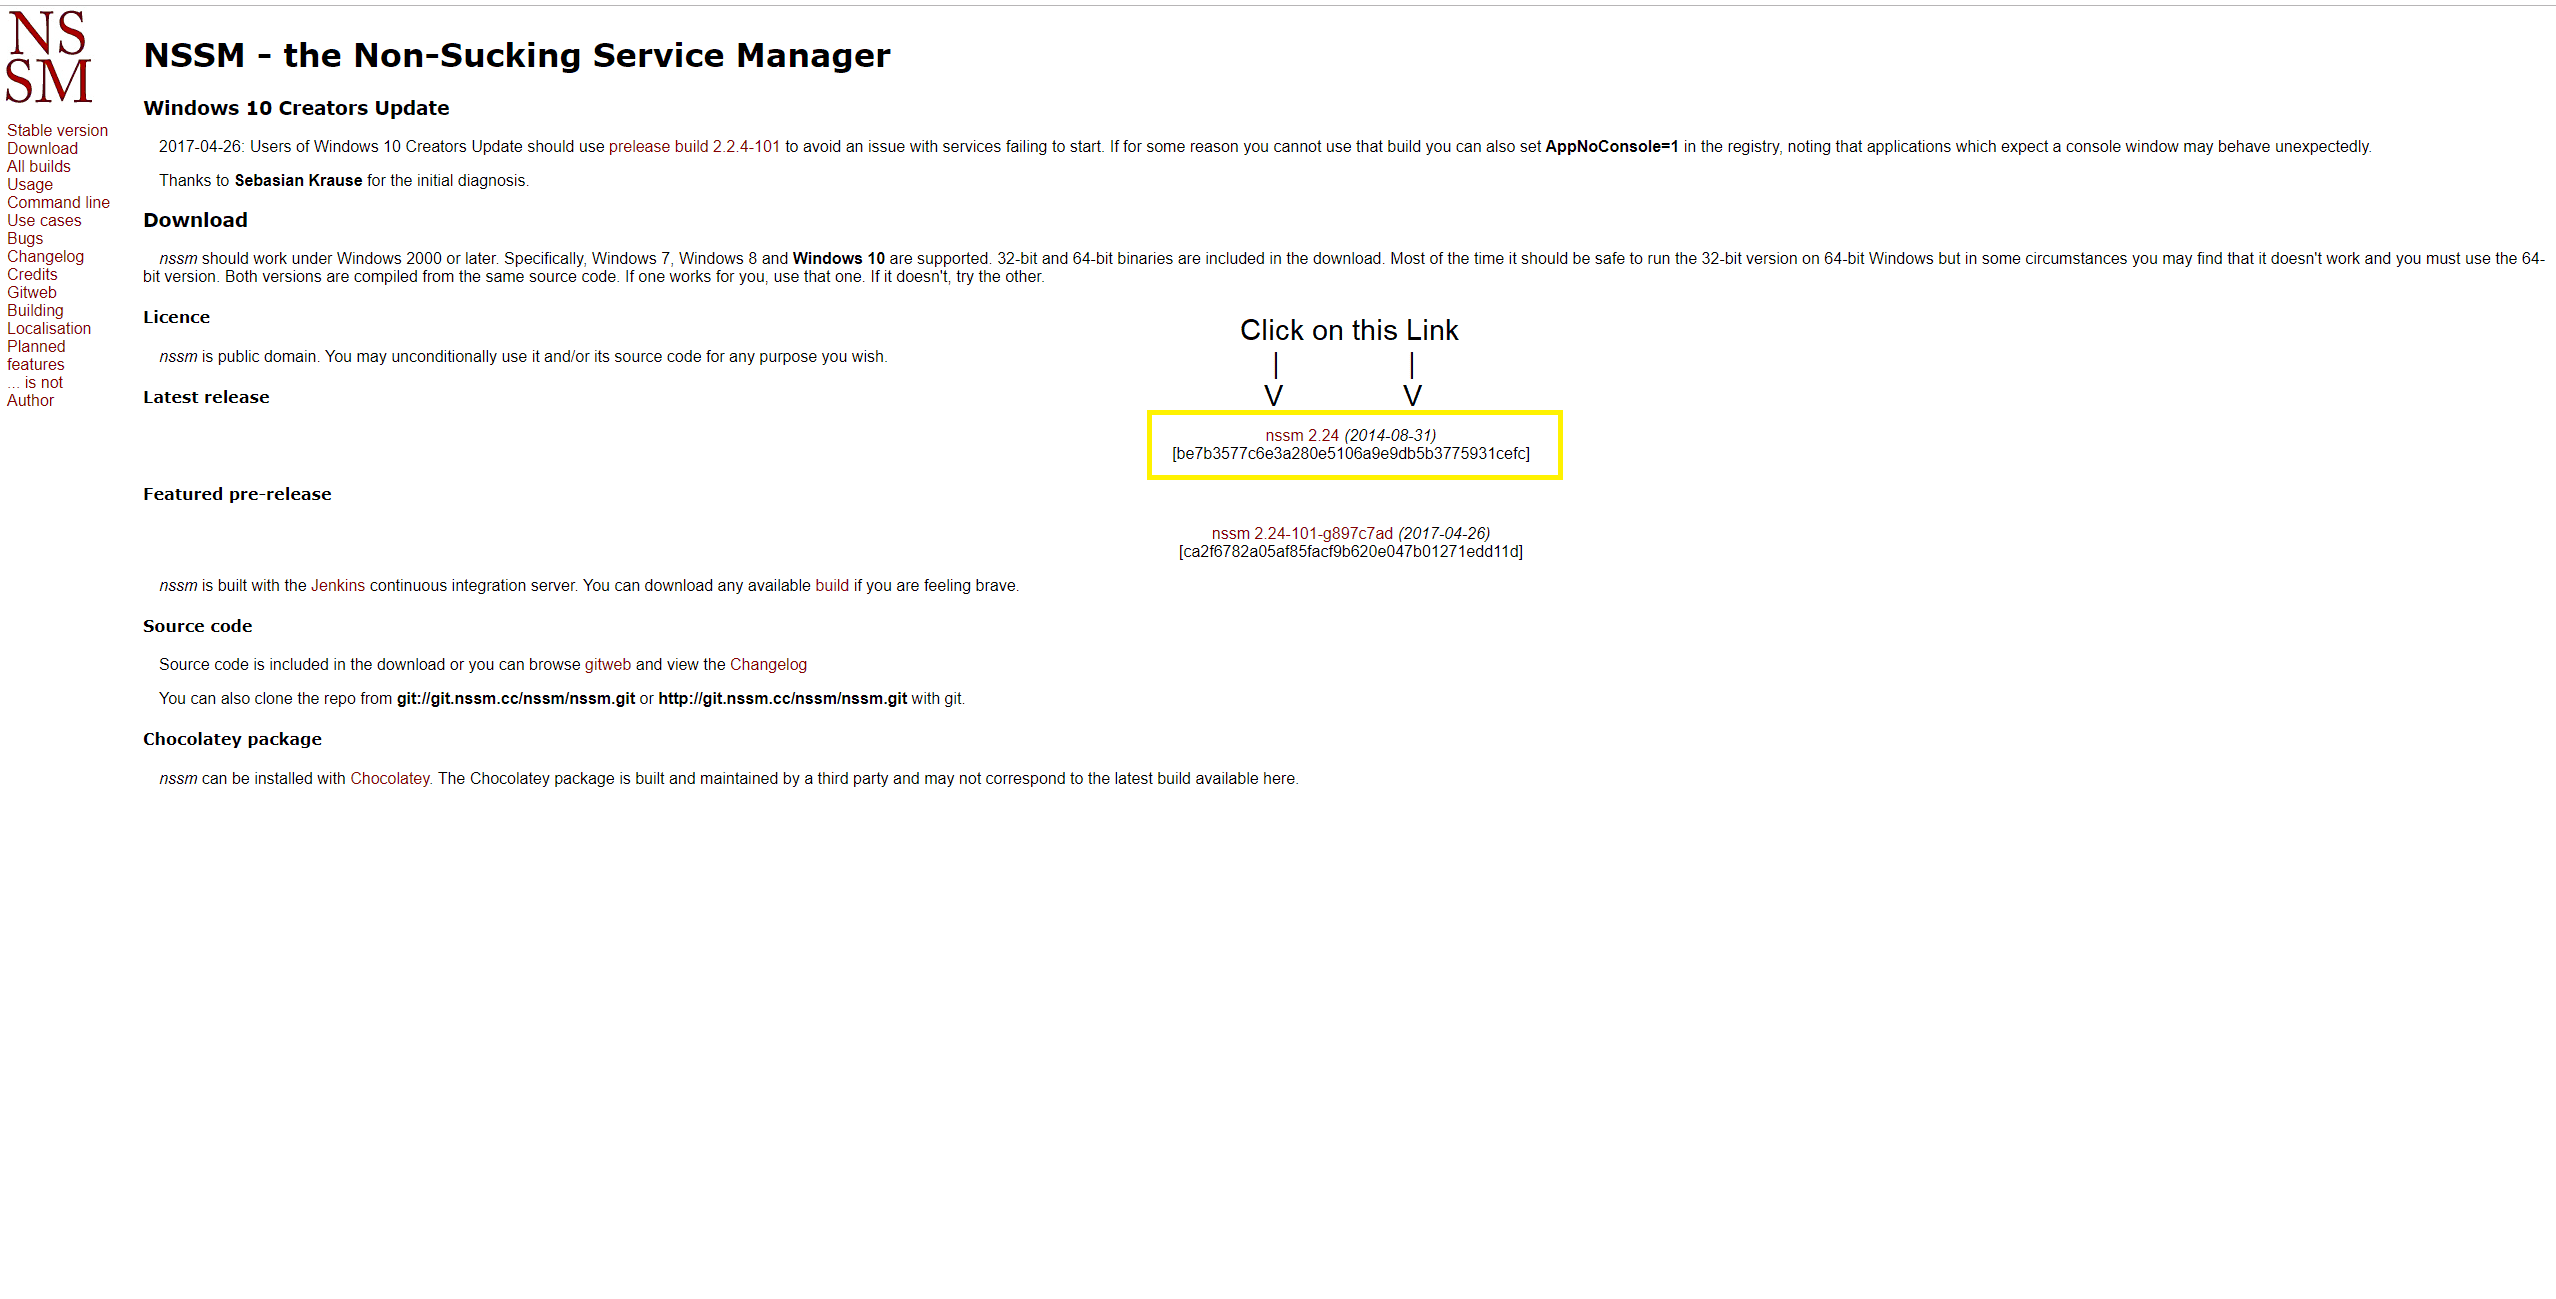
Installing NSSM
To install NSSM, go to this link and click on the link under latest release. Save this file to your downloads folder.
Next, create a new folder under C:\Program Files\ and name it nssm-2.0. You can replcae the 2.0 with whichever version you are using. After that, go back to where you downloaded the zip file, right-click it and press extract all, then extract the contents to the new folder you just created.
Step 2: Create a Server Startup File
If you have not already done so, start up Terraria, and then click Multiplayer. Click Host and Play, then follow the steps to create a new world. Once that is complete, you can exit Terraria.
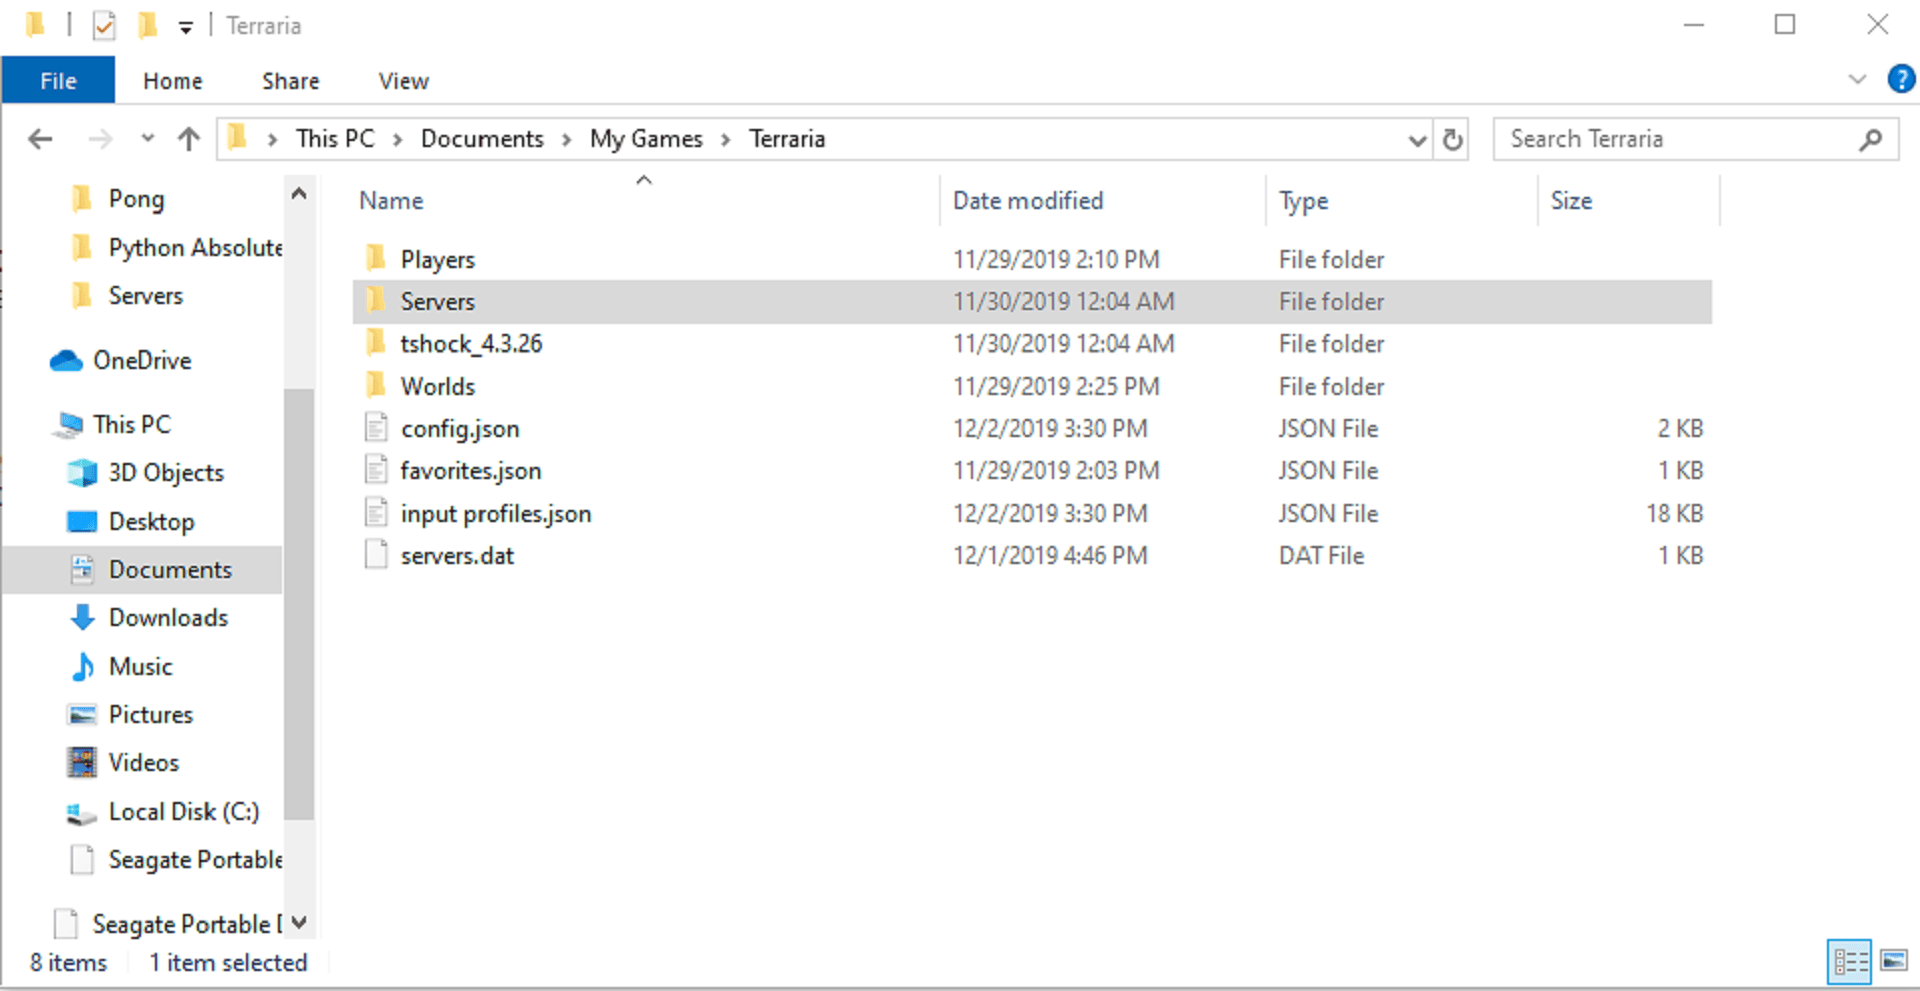
Terraria saves all the worlds in the default location on Windows 10. To find the world that was just created go to C:\Users\username\Documents\My Games\Terraria and replace username with your user Windows username. You should see a folder labeled Worlds, and if you click into it, it should contain the newly created Terraria world, labeled myWorld.wld, where myWorld is the name of your world.
Go up one directory back into the Terraria folder. Copy and paste the extracted TShock folder into this location, then create a new folder called Servers. Your directory should look similar to this:
Navigate into the Servers folder that you just created. Create a new file called myServerName.txt, where myServerName is your server name. Open the file and copy and paste the following contents into the file.
maxplayers=4
port=7777
password=serverPassword
world=C:\Users\username\Documents\My Games\Terraria\Worlds\myWorld.wld
worldpath=C:\Users\username\Documents\My Games\Terraria\Worlds\
Replace the server password with whatever you want your password to be, make sure there are no spaces in the password. Also, replace the world path, with the actual path to your world. You can get this by holding Shift and right-clicking your world file, then clicking copy as path. Then press Ctrl-V in your text file to paste the path into place. Lastly, you can replace maxplayers with the maximum amount of players you want allowed. You can also set up more server configuration stuff if you want, the details about how to do so can be found here.
Step 3: Create the Batch Script
This next step will create the batch script, which will automatically start your server. Create a new file in your Servers folder called myServer.bat and replace myServer with the name of your server. Then right-click the file, click edit, and copy and paste the following into it:
"C:\Users\username\Documents\My Games\Terraria\tshock_4.3.26\TerrariaServer.exe" -config "C:\Users\username\Documents\My Games\Terraria\Servers\myServer.txt"
Make sure the first file path is where goes to where you installed your TShock folder, and the second path goes to the server startup file we made in step 2.
To test and make sure that it works properly, if you double click the myServer.bat file it should open a command prompt window and display something that looks like this:
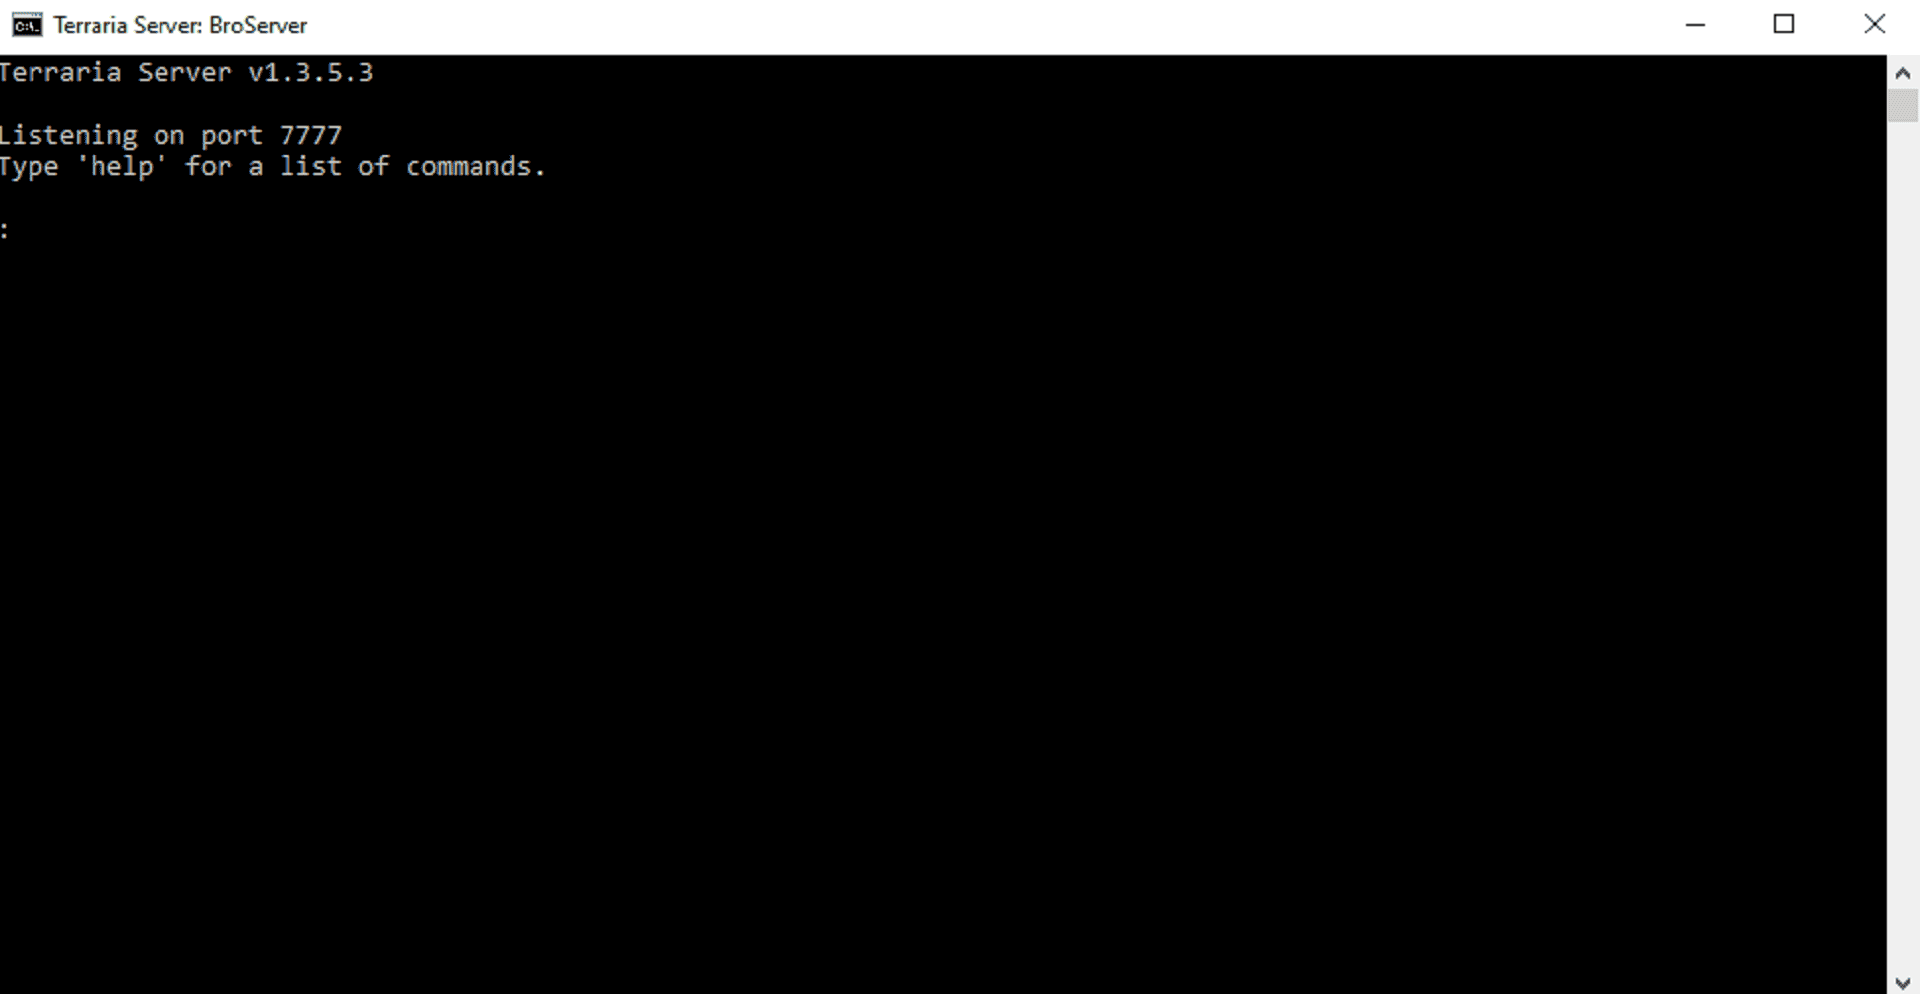
To exit this command prompt, just type exit into it and press enter. It will save your world and exit.
Step 4: Making it Run in the Background
This step will make the server run in the background so that you don’t have to have a Command Prompt window up all the time in order for the server to be up.
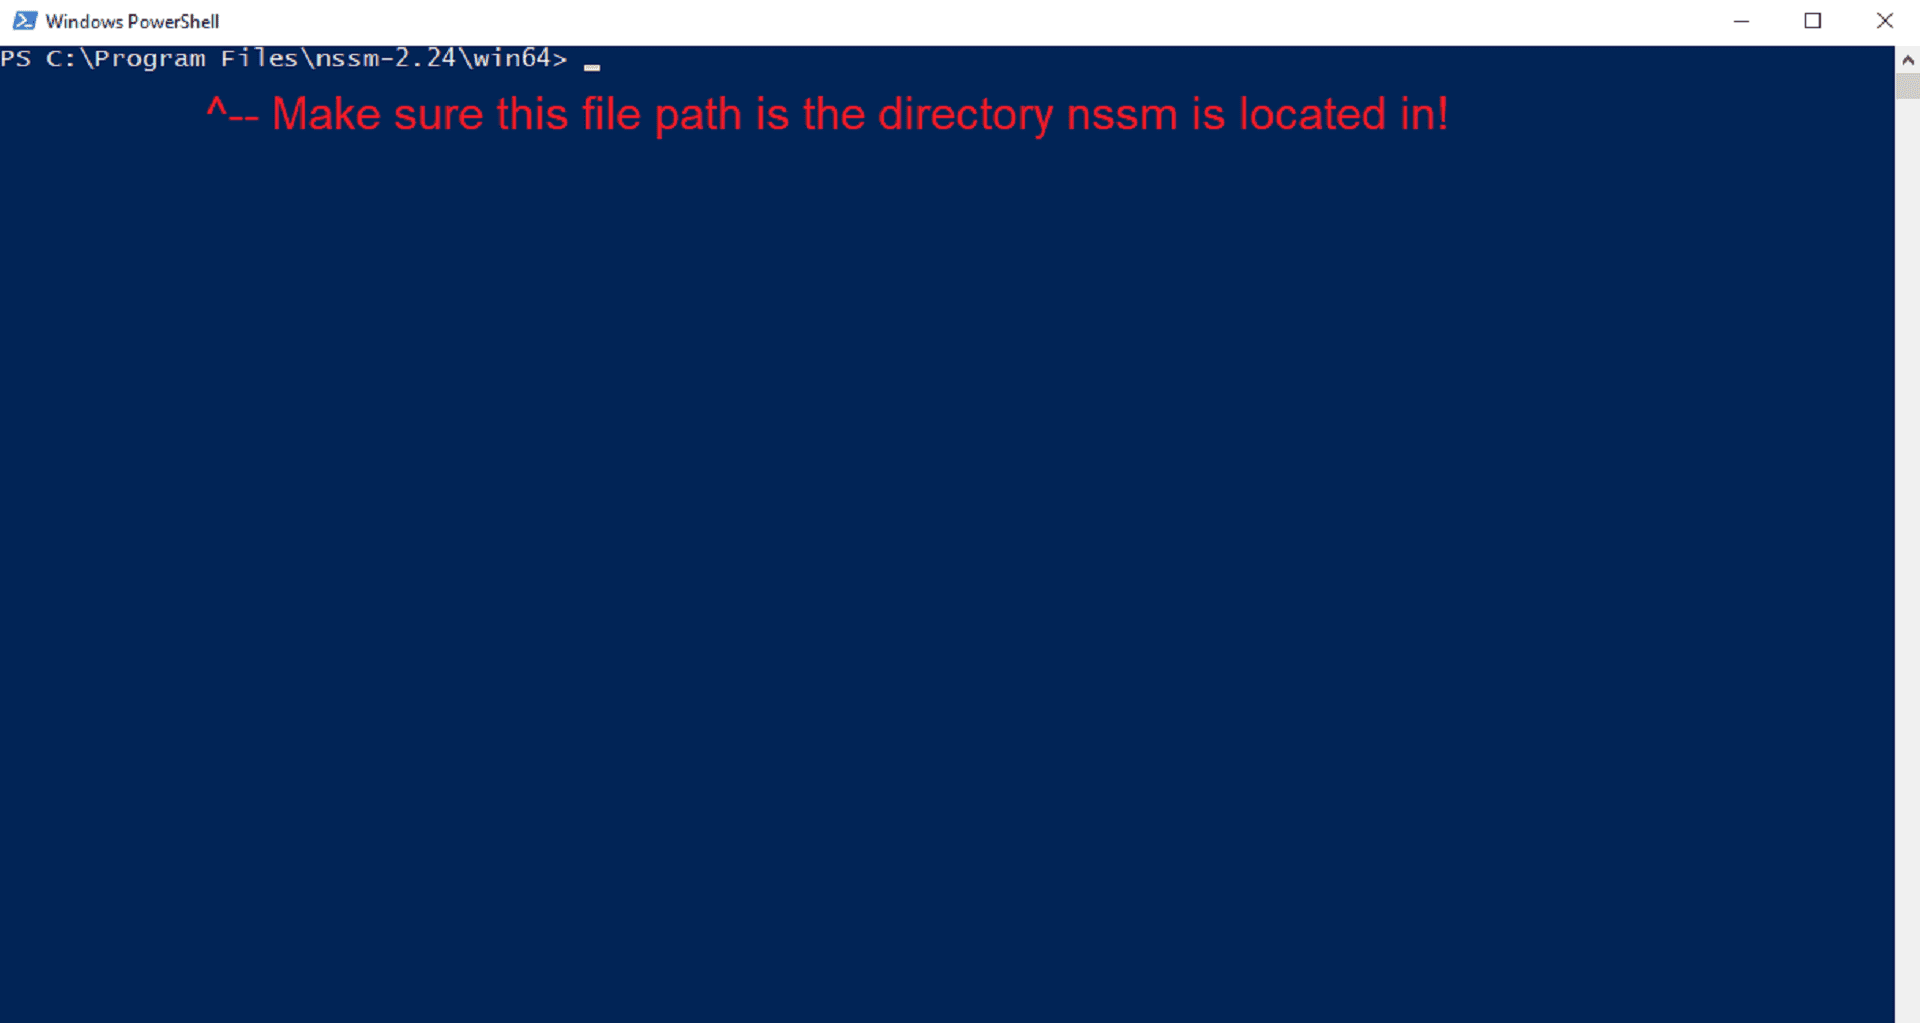
First go the folder where you installed nssm. Click into the win64 folder and then press shift and right-click the empty directory and click Open Powershell Window Here. This should open a new Powershell Window in the directory. Make sure it looks like this picture, where the top line says the directory that nssm is located in:
Type in the following and hit enter:
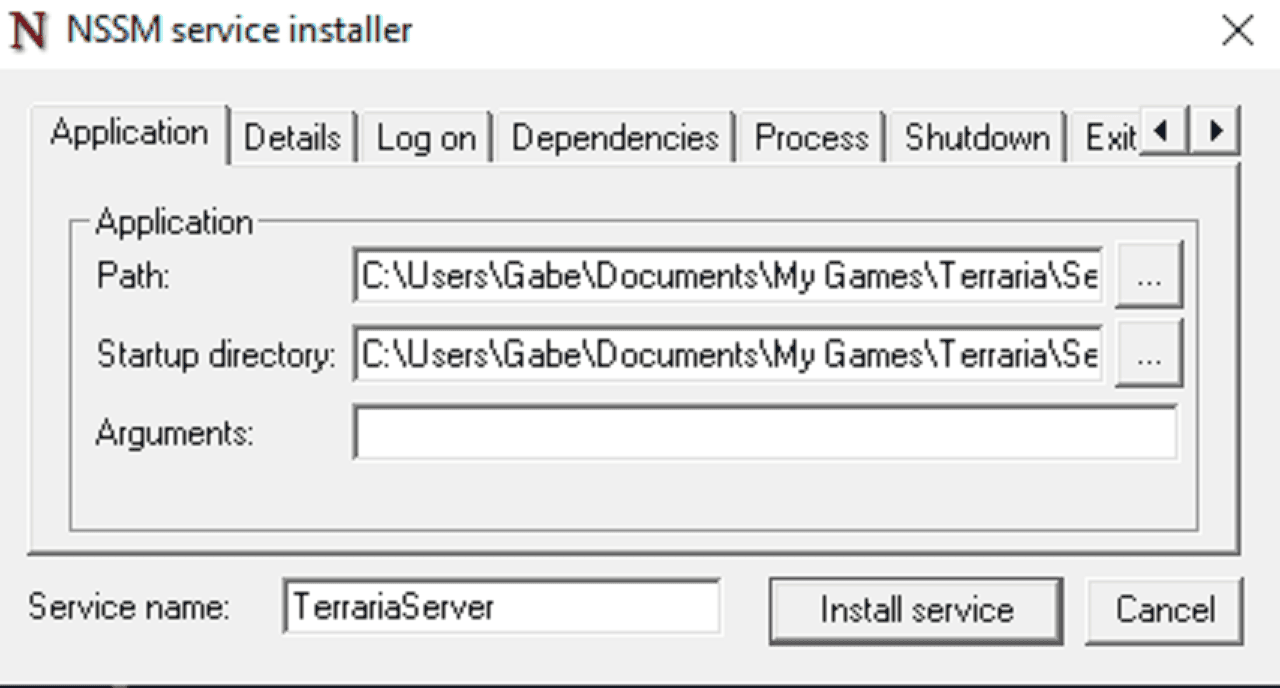
.\nssm.exe install TerrariaServer
This should pop up a window labeled NSSM Service installer. You will see 3 text boxes with labels and buttons to the right of them. For the Path label, hit the button to the right of the textbox, then look for the myServer.bat file that we created in step 3. Click the file then press open. Your window should look like this:
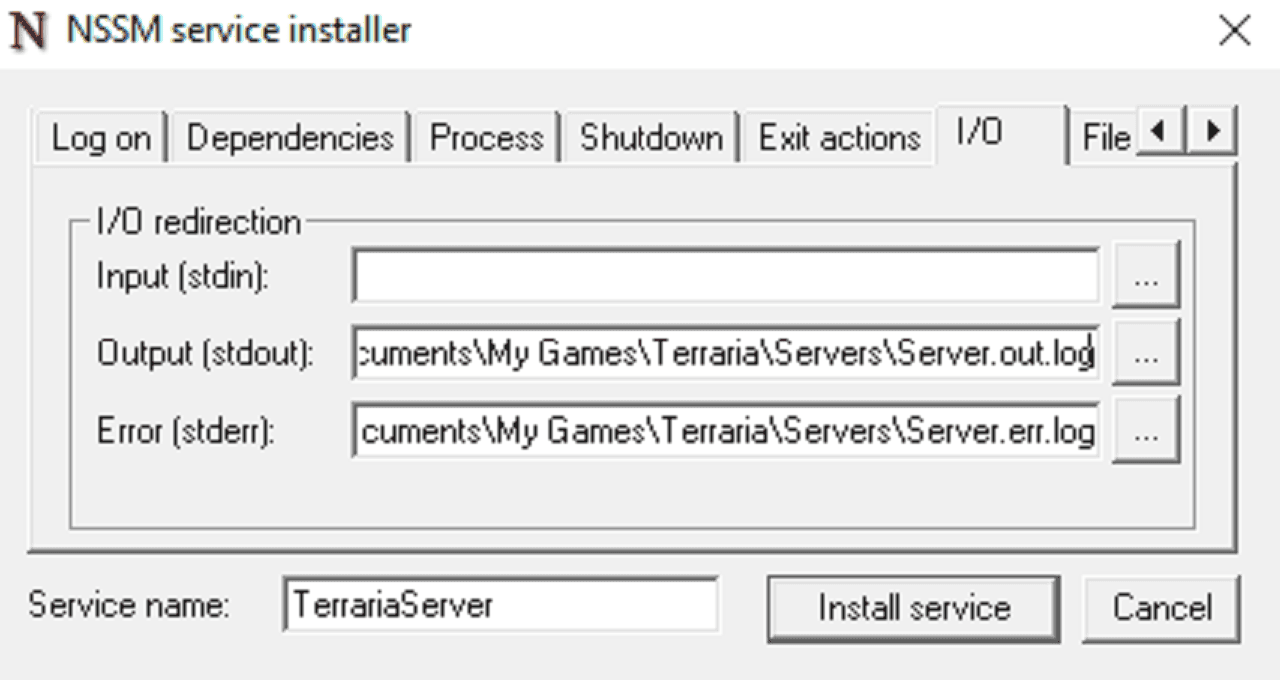
Next use the right arrow at the top, and arrow over until you see a tab titled I/O, click into this tab.
For the Output(stdout): label, click the button on the right and naviagte to the same folder that you have your myServer.bat file located in. Then type in myServer.out.log for filename, and press enter.
For the Error(stderr): label, click on the button on the right and navigate to the same folder that you have your myServer.bat file located in. Then type in myServer.err.log for filename, and press enter. Your window should look something like this now:
Finally, press install service.
Step 5: Starting and Stopping your Service
If all went well, then you should now be able to start and stop your service.
Open up a task manager, then click more details in the bottom lefthand corner, then press the services tab at the top right corner. You should see a list of services, look for your server name in that list of services. You should see it and it will look like the following picture:
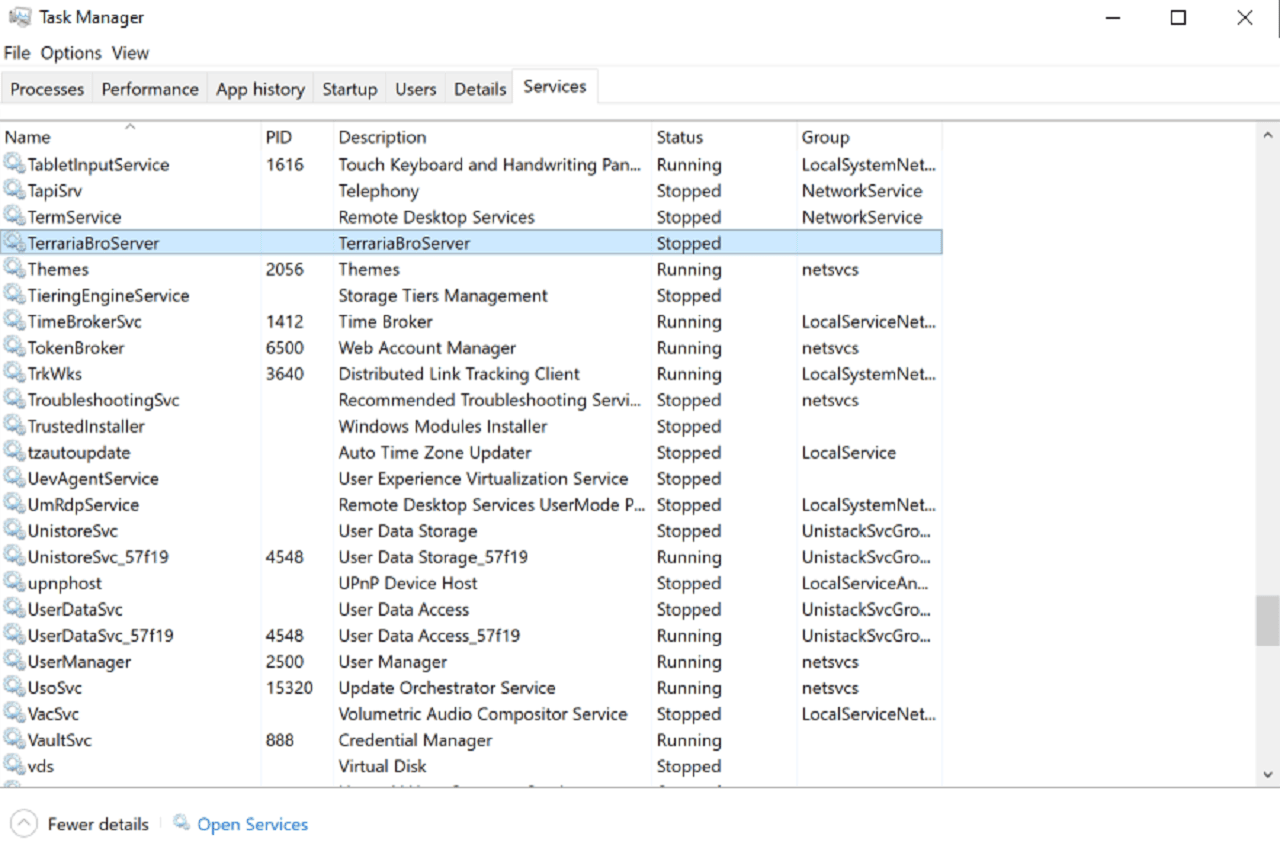
Right-click your service then press start to start it. If everything was set up correctly, you should see the status switch from Stopped, to Starting, to Running.
If you go back to your Servers folder, there should be a new file called myServer.out.log. If you double click this and open it in Notepad, then you should see a result similar to what it looked like when you clicked on the myServer.bat file in the command prompt window. If you see a myServer.err.log file, it means that something went wrong, open the file and see what the error is for further help in debugging.
Step 6: Connecting to your Server
Lastly, to connect to your server, open up a command prompt window by typing in cmd in the Windows search bar and pressing enter. Next type this in to the Command Prompt Window:
ipconfig
This will display your Ip Address so that your friends can connect locally. This Ip will change from time to time, so make sure to check it frequently so your friends can know if it changed. The address they will use to connect is the one located here:
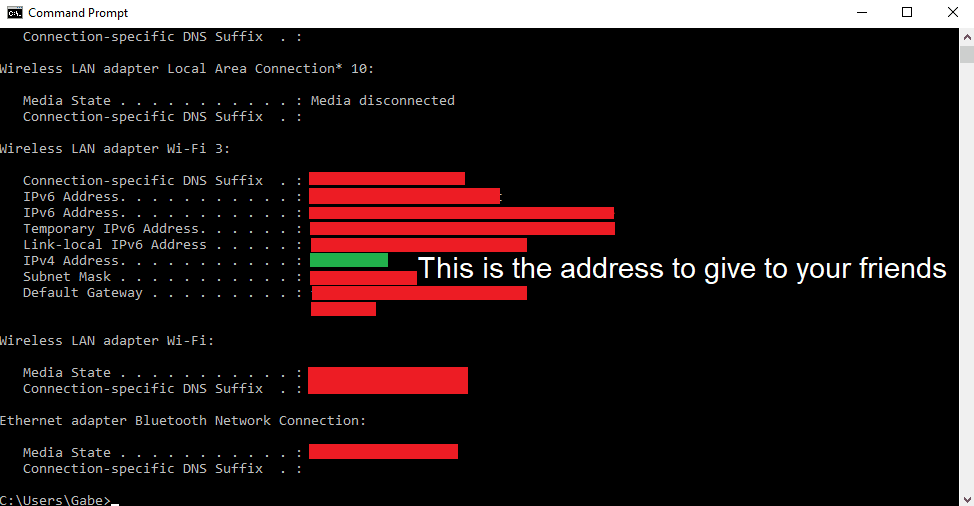
It should look something like 10.0.0.12. This will allow you and your friends to connect locally. Simply start Terraria, and then press Multiplayer, then click connect via IP Address. Then type in that address.
For you to connect to your server, type in 127.0.0.1 when asked for the IP address by Terraria.
Step 7: Making the IP Public
So all the steps above will only allow you and your friends to play locally, meaning you all have to be connected to the same WiFi router. I have not enabled a public connection, so this is as far as my tutorial can go unfortunately. If you have made a public IP, feel free to leave a comment and I will edit this article to include those steps.
One Final Note
This method will only let the Terraria server run as long as the computer running the service is not asleep. I have not found a good way to keep it running while the computer is asleep, if any of you know how, please leave a comment, thanks!
My Friends Can’t Connect
If your friends can’t connect, first check and see if you can connect.
- If you cannot connect: Check if the service is running in task manager. If it’s not, start it up again.
- If the service is running: stop the service then start it again.
- If you still cannot connect: Check the myServer.err.log file for errors.
- If you can and your friends cannot connect: Redo step 6, your IP Address will change, so they may need to try another address.
Still can’t solve it? Leave a comment below and I’ll get back to you.
Thanks for reading!